
A cluttered entryway turns every arrival and departure into a scramble—lost keys, piles of shoes, coats on chairs, and mail that never gets sorted. A “drop zone” system fixes that by giving everyday items a clear, repeatable home. Instead of fighting clutter after it spreads, you create a small “landing strip” that catches it at the door and makes resetting fast (even on busy weekdays). For more guidance, see [PDF] NASA Systems Engineering Handbook.
A drop zone is a designated landing area for the items that travel in and out of the house daily: keys, bags, shoes, outerwear, mail, and pet gear. The point is fewer decisions—each item gets a default place, so clutter doesn’t migrate to counters, chairs, or floors. For further reading, see [PDF] Welcome to the United States: A Guide for New Immigrants – USCIS.
The most reliable setups use multiple mini “zones” rather than a single catch-all bin, because shoes need airflow, mail needs to stay upright, and coats need hanging space. And the best part: a drop zone is built around habits—arriving, unloading, resetting, and leaving—so it stays functional even when life gets hectic. For more inspiration on entryway storage options, see ideas from The Spruce and Apartment Therapy.
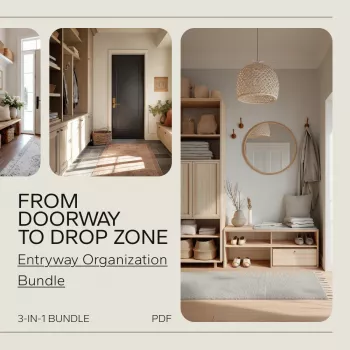
If you’d rather follow a clear plan than piece together tips, From Doorway to Drop Zone: Entryway Organization Bundle – 3 in 1 eBook, Checklist & Guide lays out a structured approach for turning a doorway area into a functional drop zone—even with real-life constraints like small spaces, shared entryways, kids, and pets.
Homes with pets often need an extra layer of “pretty but practical.” Pairing your drop zone with Pet-Proof & Pretty: The Home Décor Checklist can help you keep high-traffic areas looking pulled together while still being realistic about fur, leashes, and muddy paws.
Remove everything from the entryway area so the pain points are obvious: the shoe pile, bag pile, and paper pile. This also reveals what’s blocking traffic and what’s simply “homeless.”
Separate items used daily (keys, wallet, work bag) from weekly (umbrella, reusable bags) and seasonal (snow gear, beach tote). Daily items earn prime real estate near the door; seasonal items get a lidded bin or closet shelf.
Keep it simple and repeatable. A solid baseline is: Keys + wallet, Shoes, Coats + bags, Mail, and Extras (kid/pet add-ons, backup items).
Use one container type per zone so the system is easy to follow at a glance: a tray for keys, a vertical file for mail, a bin for hats and gloves, a rack for shoes. Matching “container-to-category” reduces friction—people can put things away without thinking.
Arrange zones to match the natural flow of entering and leaving. If you always set your bag down first, put the hook or hanger within arm’s reach of the door. If shoes come off immediately, keep the shoe storage in the first few steps inside.
Labels are especially useful for shared households, kids’ gear, and pet supplies. A quick label prevents the “I didn’t know where it goes” excuse, which is often what restarts clutter.
| Zone | Best container type | Where it works best | Daily reset time |
|---|---|---|---|
| Keys + wallet | Tray or small wall shelf | Closest reachable spot by the door | 15–30 seconds |
| Shoes | Rack, slim cabinet, or two baskets | Along the wall or under a bench | 1–2 minutes |
| Coats + bags | Hook rail + 1–2 hangers | Wall space that won’t block traffic | 30–60 seconds |
| Vertical sorter + action folder | Counter edge, console table, or wall file | 1–3 minutes | |
| Kid/pet extras | Labeled bin or cubby | Lower shelf or floor-level cubby | 30–90 seconds |
A checklist reduces project fatigue by turning the process into small wins: clear, sort, zone, container, label, maintain. It also prevents overbuying storage before categories are defined and makes the system easier to hand off so everyone follows the same steps. If you want a ready-to-use plan you can repeat season after season, From Doorway to Drop Zone: Entryway Organization Bundle – 3 in 1 eBook, Checklist & Guide is designed around that exact rhythm.
Include the items used daily when coming and going: keys/wallet, shoes, coats/bags, and a simple mail/paper sorter. Add one labeled bin for seasonal or kid/pet extras so daily zones don’t overflow.
Go vertical with hooks and a wall file, use a narrow shoe rack or cabinet, and keep a shallow tray or wall shelf for keys. Limit what lives at the door to only the current-season essentials.
Use a short daily reset (2–3 minutes), a weekly refresh for paper and overflow bins, and seasonal swaps. If a zone keeps overflowing, reduce what’s stored there or switch to a better-fitting container.

Leave a comment